I couldn’t find a good document that explained the process up uploading an update set from a file, previewing it, and deploying it, all in one tutorial. So, I thought I would quickly build it out for the general public.
For this tutorial, I assume that you have either created an update set in another instance and saved it to a file, or you have downloaded one from a third party website.
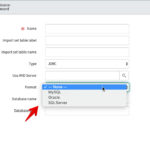
Step 1: Load your update set from a file
Browse to the “Retrieved Update Sets” module.

Click “Import Update Set from XML”

Choose the update set file on your local hard drive and click “Upload”

Now, the update set will show up as a record in your “Retrieved Update Sets” list

Step 2: Preview the Update Set
Open up the update set record and click the “Preview Update Set” button

Wait for the preview to finish

View the Preview Results

Look for any Collisions and determine what to do

You can view a collision record by clicking on it in the preview list. It will display a type of “Diff” between the current state and the update set state of the item. You can choose to Skip the update (default), or commit. It is wise to usually Skip the commit of that one item and just go and make the change manually after the update set is applied.

Step 3: Commit the Update Set
Open up the “Retrieved Update Set” record you just uploaded, and instead of clicking “Preview Update Set”, this time click the “Commit Update Set” button.

Wait for the update set to commit